请先阅读redux中文文档
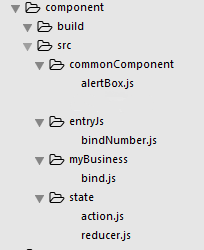
对redux和react-redux有了一定的了解后,动手改造了用es6写的一个弹出框组件,目录结构如下图

1、首先安装redux和react-redux,使用npm命令:npm install –save redux react-redux
2、接下来写展示组件,文件名为alertBox.js,内容如下:
1 2 3 4 5 6 7 8 9 10 11 12 13 14 15 16 17 18 19 20 21 22 23 24 25 26
| //“展示组件”不需要知道数据怎么变化,只需要用props获取需要动态展示的地方! import React, { Component, PropTypes } from 'react'; export default class AlertBoxComponent extends Component{ constructor(props){ super(props); } render(){ return ( //show用于确定是否展示该alert框 <div className={this.props.show?'dis':'undis'}> <div className='dialogMask'></div> <section className='dialog'> //content用于展示alert框的内容 <p className="info-notice">{this.props.content}</p> <div className="close-btn"> //handleAlertCloseButton为点击关闭按钮时的回调函数 <button onClick={() => { this.props.handleAlertCloseButton() }}>关闭</button> </div> </section> </div> ); } } AlertBoxComponent.propTypes = { handleAlertCloseButton: PropTypes.func.isRequired }
|
3、分析得知共两个action,一个是弹出框弹出,一个是弹出框关闭。action.js如下:
1 2 3 4 5 6 7 8 9 10 11 12 13 14 15 16
| /* * action 类型 */ export const SHOW_ALERT = 'SHOW_ALERT'; export const CLOSE_ALERT = 'CLOSE_ALERT'; /* * action 函数 */ export function showAlert(content) { return { type: SHOW_ALERT,content } } export function closeAlert() { return { type: CLOSE_ALERT } }
|
4、reducer根据action的两种类型,返回对应的两个状态。reducer.js如下:
1 2 3 4 5 6 7 8 9 10 11 12 13 14 15 16 17 18 19 20 21 22
| import { SHOW_ALERT,CLOSE_ALERT,showAlert,closeAlert } from './action' const initialState = { content: '', show: false }; export default function alertReducer(state = initialState, action) { switch(action.type) { case SHOW_ALERT: return Object.assign({}, state, { content: action.content, show:true }) case CLOSE_ALERT: return Object.assign({}, state, { show:false }) default: return state; } }
|
5、这时候弹出框组件写好了,那么如何在页面中使用组件并触发组件?首先写要引用弹出框组件的父组件,bind.js如下:
1 2 3 4 5 6 7 8 9 10 11 12 13 14 15 16 17 18 19 20 21 22 23 24 25 26 27 28 29 30 31 32 33 34
| import React from 'react'; import { connect } from 'react-redux' import { showAlert,closeAlert } from '../state/action'; import AlertBox from '../commonComponent/alertBox'; class BodyDiv extends React.Component{ constructor(props) { super(props); } showAlert(e){ this.props.dispatch(showAlert('我就是弹出框哦,弹出来喽!')); } render(){ const { dispatch,content, show } = this.props; return( <section> <input type='button' value='弹框出来!' onClick={e=>this.showAlert(e)} /> <AlertBox content={content} show={show} handleAlertCloseButton={()=>dispatch(closeAlert())}/> </section> ); } } function select(state) { return { content: state.content, show: state.show } } //这里必须用connect,将dispatch和state注入到BodyDiv中,在BodyDiv中通过props获取。 export default connect(select)(BodyDiv);
|
6、入口文件(bindNumber.js)中需要使用到Provider包装父组件,否则父组件无法使用store。
1 2 3 4 5 6 7 8 9 10 11 12 13 14 15
| import React from 'react'; import ReactDom from 'react-dom'; import { createStore } from 'redux'; import alertReducer from '../state/reducer'; import BodyDiv from '../myBusiness/bind'; import { Provider } from 'react-redux' let store = createStore(alertReducer); let rootElement = document.getElementById('info'); ReactDom.render( <Provider store={store}> <BodyDiv /> </Provider>, rootElement );
|
7、最后是Html,bindNumber.html
这里注明,react、jquery、react-dom以及page.css都可以通过webpack构建到bindNumber.js中。而实际中,因为这几个文件过于庞大,为了使bindNumber.js下载的快一些,可以单独加载庞大的js或者css,剩余小的js或者css合并到bindNumber.js中。这就是webpack的魅力所在,可以参考我的上一篇文章
1 2 3 4 5 6 7 8 9 10 11 12 13 14 15 16 17 18
| <!DOCTYPE html> <html> <head> <meta charset="utf-8"/> <meta name="viewport" content="width=device-width,initial-scale=1.0,maximum-scale=1.0,user-scalable=no"> <meta name="format-detection" content="telephone=no"/> <title>绑定号码</title> <link href="../../favicon.ico" rel="icon" type="image/x-icon" /> <link rel="stylesheet" type="text/css" href="../css/page.css"> </head> <body> <section id="info" ></section> <script type="text/javascript" src="../jquery.js"></script> <script type="text/javascript" src="../react-dom.js"></script> <script type="text/javascript" src="../react.js"></script> <script src="../bindNumber.js"></script> </body> </html>
|


Comments